For my second JS1K entry I wanted to do something a bit different, so I created Stars, a 3D puzzle game.
Background
My main objective in the code golfing competitions is to learn and explore concepts that I usually wouldn’t deal with. After finishing the memory game, there was still quite a lot of time left before the competition deadline, so I decided to challenge myself and try to do something different.
Some years ago I played a Flash game named Starlight, which I really enjoyed. While it wasn’t challenging, it was beautiful and I loved it’s simplicity and originality.
So, could it be done in just 1Kb of JavaScript? Well, I had to try!
Concept
The basic idea is quite simple: we have a seemingly random set of stars, which we can rotate using the mouse. Then, once we find the right rotation, a drawing is revealed.
First I planned to precalculate the coordinates of each point that would render the figure at certain rotation, which is probably what the Flash game is doing… but that would be a lot of data for our size limit. Then, I realized that we could use orthographic view.
What is the difference between orthographic and perspective views? When we use perspective, the position of a point in the screen depends on it’s distance from the camera, but that’s not the case when we use an orthographic view; regardless of their distance, all points are painted on the screen based on their coordinates. This is a really bad idea for representing 3D objects, since they’ll look very unnatural at certain angles (for instance, the front view of a wireframe cube will be just a square), but in our case, it’s perfect for representing 2D pictures. In our case, we just paint the dots on the screen using the (X,Y) coordinates, and the Z is only used for rotations.
So, a drawing is composed by a set of dots on a 3D coordinate system. The design is made and stored as a set of 2D integer coordinates, and when it’s loaded, a random Z component is generated for each dot. When there’s no rotation, the original drawing is shown on the screen, but when there’s rotation, the image is obfuscated.
Data structure
So, an efficient way to store a set of 2D coordinates in the (-20,20) range is required. After some investigation and asking around, I decided to store the figures as strings, representing each coordinate with 2 characters (one for X, one for Y). Then, the unpacking code looks like this:
  e=[].map.call(packed,i=>i.charCodeAt(w=0)-77);
  for (i=q=e.length/2;i--;)v.push([e[2*i+1],e[2*i], 30*Math.random()-15]);
So, the packed implemented drawings look like this:
- Star (10 points): “IRJ[QTZVVMZDQFJ?IH@M”
- Cat (28 points): “LTLPTNTLOLOHQFRFRHTHTDMCHCEGFHIELEIHIKLNHNJPJTHVNVPSPQNN”
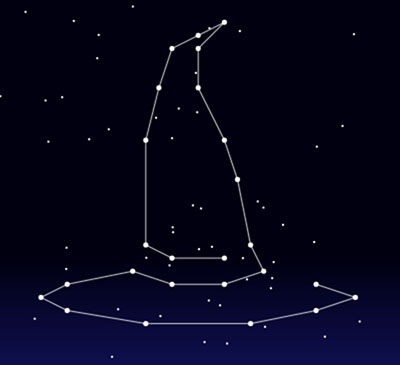
- Hat (25 points): “UXV[WXXSXKWEVCUETJUMUQTTRSMRJQFOCOAQBOCMFLJKRKSMSQ”
After we load the main dots, we also generate a number of random dots that aren’t actually part of the drawing, and which are rendered as smaller stars.
3D Rotation
In order to control the stars, first we randomly determine a point in the screen at the start of every level (which is our goal, what we need to find in order to complete the level).
Then, the rotation of the stars is determined by the mouse cursor distance to the goal; the distance on the X axis affects the X axis rotation of the stars, and the same with the Y axis. It’s important to never rotate near π radians (180 degrees), as the image would also be revealed due to simmetry.

So, when the mouse is exactly at our goal, the image is rotated 0 degrees on it’s X axis and 0 degrees on it’s Y axis; hence, the image is rendered with exactly the same X and Y coordinates as we defined it!
Rendering
Rendering a constallation of stars is probably one of the simplest scenarios, as we don’t have to deal with Z-ordering or occlusion culling; we just determine the screen position of the 3D point, and we’re done!
With the orthographic view, we don’t even need to project the dots, just apply the 3D rotations, and use the resulting (X,Y) coordinates.
First we iterate the dots, calculating their screen position and painting them; we also store them, on a line buffer, which we use afterwards to paint the lines between the stars if we’re close enough to the goal. Those lines go from the first dot to the last as a single line, but we do some postprocessing depending on the level in order to give it some variety, like some extra lines on the hat, or the cat’s eyes. Here’s an image of the hat without the extra lines:
Tricks
When developing this sort of demos/games, it’s important to keep an eye open for anything that can give an advantage, doing the same with less bytes, or getting some nice feature cheap (or free!). Other than the standard golfing advice, here’s some of the things that I made in this demo:
-
Level start/end animation: the initial and final animations use the same scaling variable; when the level starts, looks like a “big bang” as 3D rotation is applied, and when it ends, the same scaling makes it look like the figure moves toward the camera, with exactly the same code.
-
ES6
Math.signfunction: this new math function just returns -1, 0 or 1 if the number is negative, zero or positive respectively. This was quite useful once the mouse cursor is close enough and the gap is closed automatically, since we can use it to move towards our goal in a way that works quite well with Regpack:
x+=Math.sign(m-x);
y+=Math.sign(n-y);
Commented source code
// Initialize the level
O=function(e) {
  l=e%3;
  // Randomly calculate the goal
  m = a.width * Math.random()|0;
  n = a.height * Math.random()|0;
  f = 30;
  v = [];
  // Unpack star map
  e=v.map.call([
    "IRJ[QTZVVMZDQFJ?IH@M",
	"LTLPTNTLOLOHQFRFRHTHTDMCHCEGFHIELEIHIKLNHNJPJTHVNVPSPQNN",
	"UXV[WXXSXKWEVCUETJUMUQTTRSMRJQFOCOAQBOCMFLJKRKSMSQ"
	][l],i=>i.charCodeAt(w=0)-77);
  for (i=q=e.length/2;i--;)v.push([e[2*i+1],e[2*i], 30*Math.random()-15]);
  // Decorational small stars
  for (i=60;i--;)
    v.push([30*Math.random()-15,30*Math.random()-15,30*Math.random()-15]);
};

s = Math.min(a.width, a.height);

R = function(e) {
  if (w) {
    // We won, move automatically towards the goal and stay there
    x += Math.sign(m-x);
    y += Math.sign(n-y);
	if (w++>150) O(l+1);
  }

  // Background gradient
  e = c.createLinearGradient(0,0,0,a.height);
  e.addColorStop(.7,"#001");
  e.addColorStop(1,"#115");
  c.fillStyle = e;
  c.fillRect(0, 0, a.width, a.height);
  c.fillStyle = c.strokeStyle = "#fff";

  o=(w>80?(w/4 -19):1)*(1-f*f/900);
  c.globalAlpha = 1/o;

  if (f)f--;

  // Start with end vertex (careful with multiple levels!!)
  e = [l?l>1?v[12]:v[25]:v[0]];
  for(i in v) {
    // Apply 3D rotations
    k = v[i];
    u = Math.PI*(n-y)/(y<n?n:(a.height-n))/2;
    g = - k[2]*Math.sin(u)+Math.cos(u)*k[1];
    h = k[1]*Math.sin(u)+Math.cos(u)*k[2];

    u = -Math.PI*(m-x)/(x<m?m:(a.width-m))/2;

    j = h*Math.sin(u)+Math.cos(u)*k[0];

    k.x = j * o * s / 30 + a.width/2;
    k.y = g * o * s / 30 + a.height/2;

    // Paint star
    c.beginPath();
    c.arc(k.x, k.y, i<q?5/2:1, 0, 2*Math.PI);
    c.fill();

	// Store it for line rendering if necessary
    if (i < q-(l-1?0:2))
	  e.push(k,k);
  }

  // Line postprocessing
  if (l-2) {
    e.push(v[0]);
  } else {
	e.push(v[13],v[2],v[16]);
  }

  // The line intensity depends on the distance to the goal
  c.globalAlpha = Math.max(0,.8-Math.hypot(m-x, n-y)/(.8*s))/o;

  // Are we close enough to win?
  if(!f&&!w&&c.globalAlpha>.7)w=1;

  for (i=e.length/2;i--;) {
    // Draw line
    c.beginPath();
    c.moveTo(e[2*i].x, e[2*i].y);
    c.lineTo(e[2*i+1].x, e[2*i+1].y);
    c.stroke();
  }
  c.globalAlpha = 1;

  requestAnimationFrame(R);
}

onmousemove = function(e) {
  // If we won, ignore input
  if (!w){
    x = e.pageX;
    y = e.pageY;
  }
};

// Initialize game
O(x=y=0);

// Render
R();

// Change function to ES6 format
// Change 2.5 to 5/2
// Minified, ES6 and packed (with Math)
Final words
With this game I wanted to do something different, and I believe I achieved it. I was lucky to get an idea that actually required a simpler form of 3D rendering in order to work, and I really like the result. I’m already looking forward to next’s years compo!